Or, why I have more respect than ever for professional audio/video editors.
Filming
- If at all possible, get the camera at least the day before and make someone give part of a talk for you, preferably with slides. Watch this footage that evening.
- Figure out your tripod before taping a session. I made a lot of really annoying clicking noise because I didn’t understand how to change the angle of the camera, which of course added to the Audio Editing work.
- Plug the camera in, if at all possible – relying on battery is a recipe for disaster. Displays lie.
- If your camera only runs on battery (inexpensive Sony), you need three fully charged ones if you’re going to be filming all day, even if you have the charger with you.
- Bring the battery charger. Charging in the camera is usually much slower.
- If you must have a drink with you, do not use a cup and saucer. Mug is best, and make sure you don’t SLLLUURRRP! Do not eat.
- Dab at your nose, don’t blow or wipe it, and cough away from the camera.
- Stifle your laughter 🙂
- Do not unzip or dig through your bag.
- Don’t focus on the screen the whole time, especially if you have a lively presenter. That’s what the screen capture is for! You want to give viewers a bit of the feeling of “being there”.
- Follow the presenter, but not zoomed in too much.
- Point toward and zoom in on audience members as they’re speaking. This will also improve the sound you get from them.
- Watch the speaker’s hands to know when s/he is going to start doing something on the screen.
- Watch your camera free space. Copy to PC between sessions just to be on the safe side.
- You will not actually absorb much from the sessions you’re recording. Don’t worry, you’ll more than make up for that later during editing.
Extract from AVCHD
Benefit of AVCHD over MP4: if you lose power, you won’t lose much footage if your camera stores video as AVCHD or TS; MP4 has to be finalized.
Drawback: Macs treat AVCHD as a single file with multiple clips, and there’s no nice way to extract a lot of them at once from the GUI
Here’s how with ffmpeg and Handbrake:
From a Terminal window
- cd into the folder containing the AVCHD with your videos
- cd AVCHD/BDMV/STREAM
- for f in *.MTS; do ffmpeg -i “$f” -vcodec copy -acodec copy ${f%.MTS}.mkv; done;
- mv *.mkv ../../../
Next, open Handbrake, navigate to the folder with the AVCHD and now the *.mkv files you extracted with ffmpeg.
Click “Browse” by the Destination path and navigate to the folder with your AVCHD and *.mkv files, or anywhere else you want to see *.mp4 files. The Output settings I have here are the ones suggested by an acquaintance who wishes to remain anonymous:

Add all the titles to the queue by choosing File -> Add All Titles To Queue. You will receive a warning that you will, indeed, add all titles to the queue. Click Show Queue to make sure everything’s in, then click Start and go find something else to do for awhile. Make sure your laptop is plugged in 🙂
Audio Editing
This is where you will spend the most time. Allow at least four hours per hour of audio, and that’s just to do the basic noise removal and to soften the most egregious sudden noises. More time = better result.
Audacity
I use open-source Audacity, but be careful if downloading from SourceForge – I got a stupid “AdAware Web Companion” for my trouble that I only spotted when checking out my CPU usage and seeing something to do with “lavasoft”. The online help is excellent, though.
- The keyboard shortcuts provides a good overview of what’s in there.
- Read the glossary if you are totally new to audio (helped me immensely).
Background noise
- Listen through your first piece zoomed in at about 1 second per centimeter of screen. You will learn how to identify clicks (like when you’re playing with the tripod when you shouldn’t), coughs and your own cackling, as well as soft audience speech and the quietest time.
- Identify the quietest 0.5-2 second intervals. Shortcut for this is to use Analyze -> Silence Finder and keep “raising” the negative dB (effectively dropping the volume you consider to be silence) until you find only one or two 0.5 second or longer candidates.
![Silence Finder - keep working that "Treat audio below this level as silence [-dB]" variable...](https://mandie.net/wp-content/uploads/2016/05/capture11.png)
Silence Finder – keep working that “Treat audio below this level as silence [-dB]” variable…

Background noise candidate at low zoom
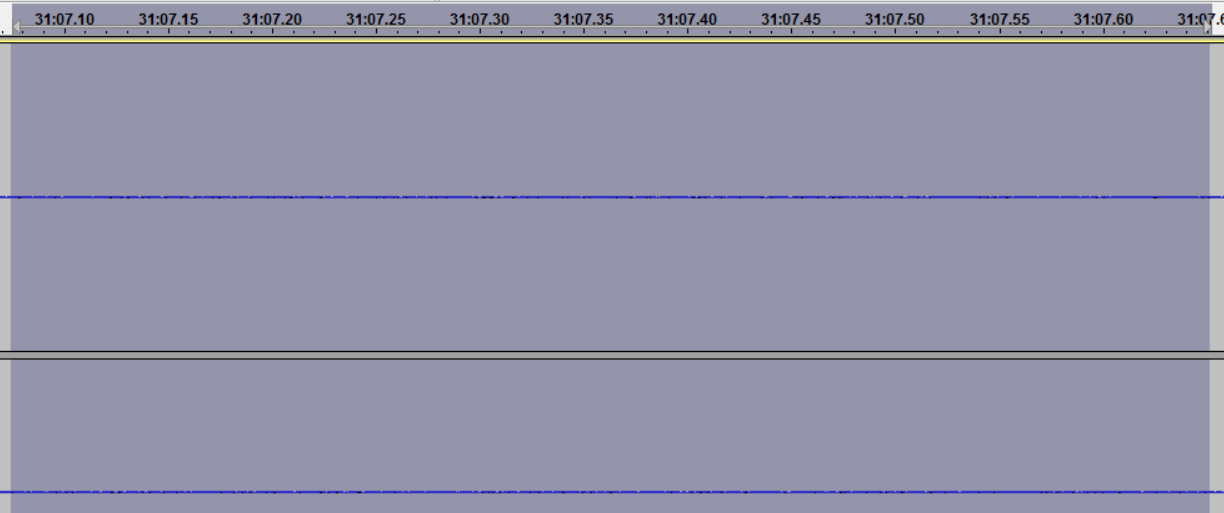
Background noise candidate at very high zoom
- This is what you will want to use for noise removal. At this point in your audio engineering career, you probably aren’t going to be able to automate the removal of sudden unwanted noise (like your own cackling). Here’s the Audacity noise removal guide that made the most sense to me.
Clicks, Coughs and Other Things to Remove or Make Quieter
- Now, look for the clicks. At a distance (several seconds per centimeter), they show up as tall vertical lines. Select and replay. This one has speech in between the lines, so I don’t want to just mute them out.
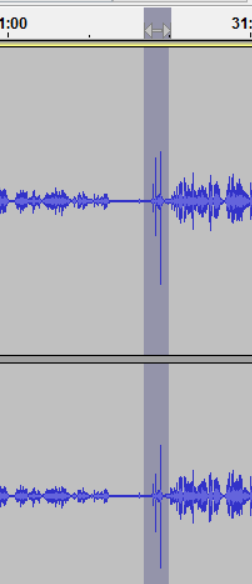
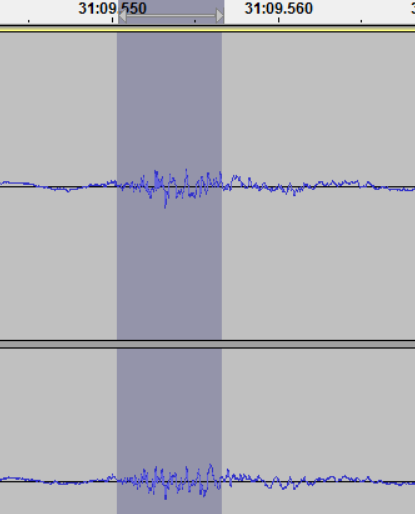
- Zoomed in, they look something like cones that start big and get small. Speech, by contrast, looks more like sine waves.

- Zoom in more on one click, select the part I did, and use the “Fade In” effect to mask it. You can silence it completely, but that is likely to sound weird. At this level of correction, the click is still audible, but it’s not as jarring as the unedited click.

- Repeat for the other, then select and replay the section to make sure you didn’t harm the speech.
- Coughs are sometimes similar, but I’ve found it’s better to use -10 dB amplification on them if someone is speaking. You’re not going to get rid of it, you just don’t want it to be as jarring. Nose-blowing should be covered with a -12 to -20 amplification, since it’s a steadier noise. If any of this happens when the speaker is not talking, just cut it out.

Coughing during otherwise silent period. Note the two pulses with inflection at beginnings. Simply silence this.
- I drop very loud laughter down a bit by using a -10 to -12 dB amplification. You *want* to capture the feeling of the room, but having the laughter be way louder than the speaker makes listening uncomfortable if viewers have their volume turned up!
Audience Amplification
When an audience member is talking, I’ll bump their speech up by about +8 to +12 dB, while trying to avoid making them louder than the speaker. Why? Background noise, and the same reason I don’t want laughter to be far louder than the speaker. Be careful to avoid amplifying the speaker’s “Yes, go on, sure”s – ouch!
Video Editing
Allow about one hour per hour of video, not including render time.
I ended up using ShotCut, which is also open source. Camtasia is absolutely lovely and very suitable for IT productions, but even the fully-functional 30 day free trial puts a huge timestamp on the rendered videos, and I don’t want to invest hours in developing end products I can’t really share to get broad feedback on without spending the $300 for a license.
Unlike Audacity, Shotcut does not have much in the way of written documentation, but does have a pretty good video tutorial that gave me most of what I needed.
General Workflow
- Open raw video or edited audio track
- Add to Playlist
- Start a track in the timeline for each of video and audio
- Append to correct track
- Append subsequent videos/audio tracks
- Mute video track
- Slide audio track until the points appear to align with the muted video audio wave
- Watch first few minutes of video, focusing on speaker’s mouth. Once that is right, watch the transition between video segments carefully for audio sync.
- Optional: add watermark (see below)
- Save project file.
- Encode (render). Start editing your next audio track – this takes FOREVER 🙂
Tips
- Adding a watermark will make unrendered playback glitchy. Don’t panic. It will add a surprising amount to how long it takes to render the video. Again, don’t panic.
- Encoding/rendering takes FOREVER, even with a dual Xeon X5670 with 64 GB RAM (ShotCut doesn’t use all those cores, sadly). It takes about 45 minutes to render a 1 hour video at 960×720 if there’s a watermark.
- 720p is good enough for YouTube, unless you have some really fine screen action going on. 960×720 rendered in less than half the time and half the file size than the source resolution of 1440×1080.
Publishing
(a.k.a., uploading to YouTube)
- You will need to verify your YouTube channel account even if you’re a longtime Google/Gmail user in order to upload videos over 15 minutes or to pick custom thumbnails.
- You will need a custom thumbnail. YouTube picks terrible random thumbnails.
- Make a playlist for the conference/group this video belongs to. I used “PSConf.EU 2016” for the PowerShell Conference EU 2016 videos.
- Uploading depends on your connection speed.
- Initial processing takes about 25% of video duration, depending on resolution. 720p is probably as high as you want to bother uploading.
- Long videos will initially be available in glorious 360p, so don’t publicize it right away.
- Write the description like a news story. Start with something that will catch the reader’s interest and make them want to watch, because this is what will show up when the video is shared on Twitter and Facebook.
- Put people’s public Twitter handles in the description.
- Think about tags. For example, I used “PowerShell”, “PSConf.EU 2016” and the speaker’s name, as well as the general subject of the talk (ex: Software Engineering, SQL Server, Security)
